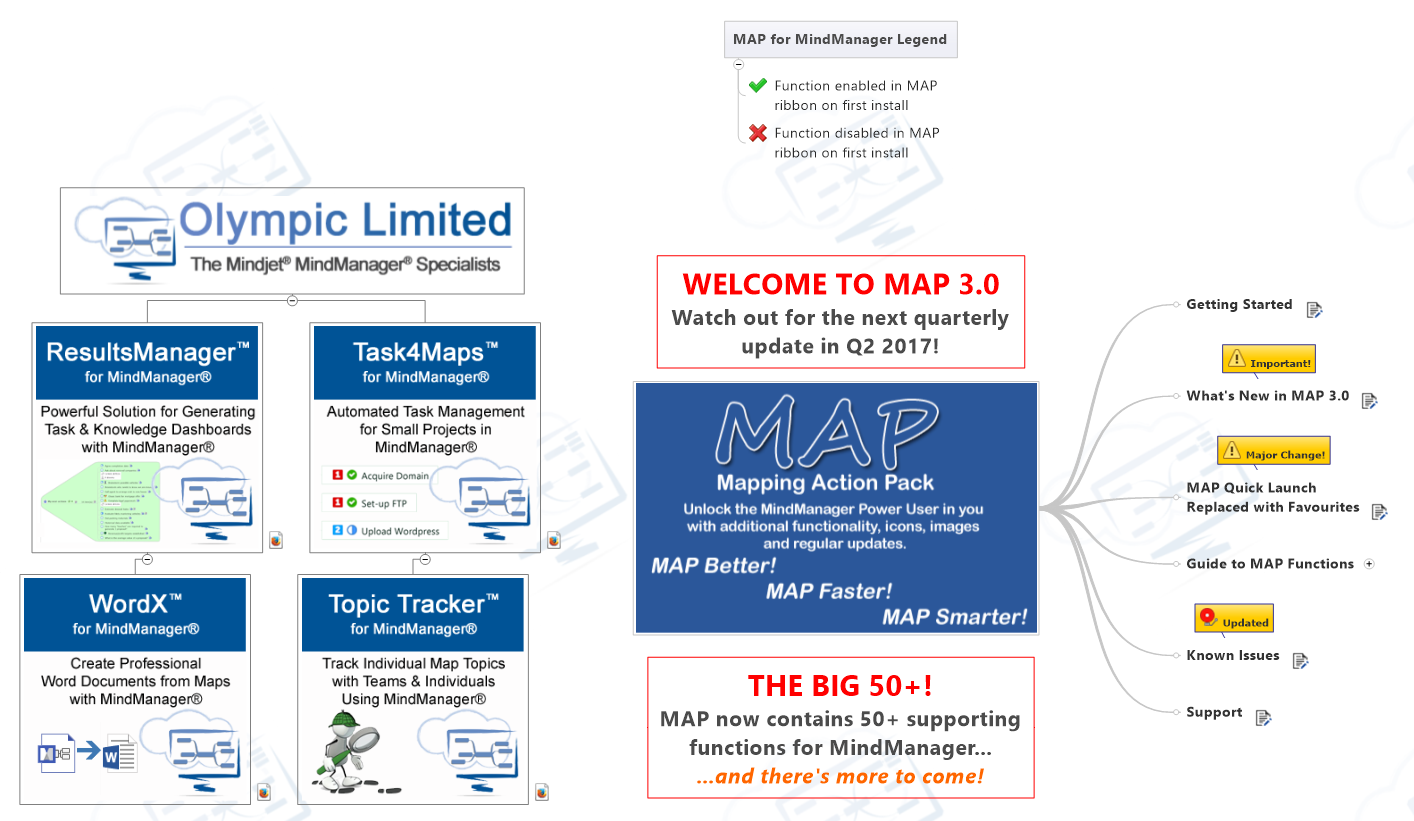
MAP™ for MindManager
The innovative "Swiss Army Knife" that extends & enhances your application of Mindjet® MindManager® in business & personal projects.
Try it free today for 14 days. You'll wonder how you ever managed without.
MAP ACTIONS
Edit Notes Font
 The Edit Notes Font function lets you change the font style and/or font size of text in a Maps Topic Notes and is a great time saver when you want to change the format or look/feel of your Maps output in other document formats.
Currently to change the font style for individual Topic Notes you have to select the Topic, open the Notes Task Pane, select the entire text, (CTRL + A is the quickest way), and then select the font style and formatting from the Notes menu. If you wish to do this to several Topics you have to repeat the process for each Topic.
Edit Notes Font enables you to carry out this process on all selected Topics, saving you time whenever you want to change the style of your Map output when exporting to another format such as Microsoft Word or PowerPoint.
Changing the Topic Notes across the entire Map can be done by simply selecting the Map’s Central Topic and then repeating the above process.
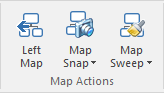
Left Map
Left Map is a Map Action that changes the horizontal aspect of Map Topics from right to left. MindManager only supports right handed Map Topics when in either Right Map, (obviously), or Tree mode. Left Map lets you change these Map layouts so they have the Topics located on the left hand side of the Map creating a visually different look for your audience.

Left Map is useful when you want to use MindManager to create Funnel Timeline style Maps where the Topics flow left to right converging on a single end point, the Maps Central Topic.
There is no Undo function on the Left Map command. Once applied to your Map you must use the MindManager Layout command from the Design menu to change the Maps Topic layout back to another type.
Map Shader
Map Shader is a Map Action that helps you create standardized color shades across either the Map or a selected Topic tree.
Map Shader will help you quickly add color and spice up your Maps with just a few clicks. Shading can be light or intense depending on your need and can flow either out towards the edge of the Map or inwards flowing towards the Maps Central Topic.
Map Shader works using the Fill Color of the Map Central Topic or the Fill Color of the selected Topics Parent Topic. Play with the command to understand how it affects the Map and how to get the best looking results.
Map Snap
The Map Snap capability enables you to create copies, (“snaps”), of your working Map. Snaps can either be created on demand or automatically in set time spans. This enables you to quickly backup your Maps as you work or create a sequence of your Maps state as you work. This can be useful when Brainstorming with a group so you create snaps that show how the Map evolved.
Map Snap will also create a hi-res image of the Map which can be stored to the Clipboard and pasted into another application quickly.
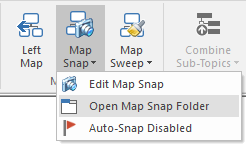
Creating a Map Snap
To create a Map Snap simply select the top section of the Map Snap command which is located on the Map Action group of the MAP ribbon menu.
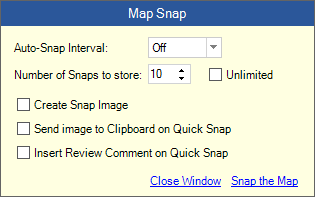
When you click the command the Map Snap Options dialog will open.

You can set various option for the Snap. The options are stored with your Map so you can set different options for different Maps depending on your needs.
Auto-Snap Interval: This lets you choose a timed interval to have a Map Snapped. The intervals are 5/10/15/30/60 minutes. When Auto-Snap is enabled your Map will get Snapped at the corresponding interval and stored in the Map Snap directory.
Number of Snaps to Store: This can be any number between 1-100. If you are using Auto-Snap you will effectively be storing the last 10 Snaps on a rolling basis. As each new Snap is created the oldest one will be removed.
If you check the “Unlimited” option then your Snaps will continue until you change the settings.
Create Snap Image: Enable this to have a hi-res image of the map created and stored with the Snap.
Send image to Clipboard on Quick Snap: Enable this option to have a image of the Map stored on the Clipboard so it can be immediately pasted into another application. This will only happen for single Snaps. Auto-Snap will not create an image for the Clipboard.
Insert Review Comment on Quick Snap: When this option is enabled a dialog will open when using the Quick Snap feature. This enables you to enter a text comment which is then placed into the Map as a Review Comment on the Central Topic. The Review Comment contains the name of the user, the date/time expressed as UTC time, the Map revision number together with the text comment.
If the Map does not already have a Review Comment on the Central Topic only the snapped Map will contain the comment. If you are already using a Review Comment in the Map then the comment is added to it.
Once you have selected the option for the Map click the Snap the Map link to create the first Snap. A Snap will be taken and stored in the Map Snap directory.
The Map Snap Directory
When MAP is installed it will add a new folder to your My Maps folder called named Map Snaps. Whenever you create a Snap for a Map a folder will be created with the Map Name to store the Snaps and images.
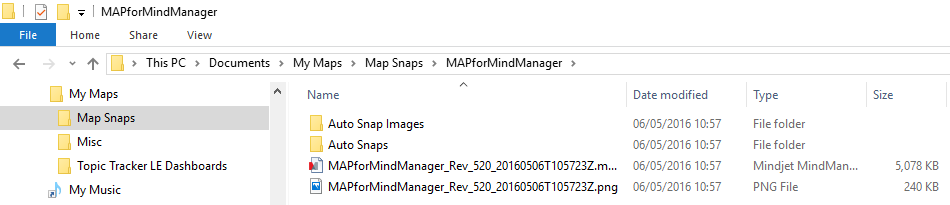
 As shown above each Map Snap is saved with the Map revision number and date/time in UTC format. Quick Snaps are stored in the root folder and Auto-Snap Maps and images are stored in individual folders as shown. You can access the Map Snap directory quickly from the Map Snap command on the MAP ribbon menu.
Editing a Map Snap
 Once you have set up a Map Snap you may wish to change its settings at a later date. To do this simply select the drop down menu from the main command and then click the Edit Map Snap command. This will open the Map Snap Options dialog again. This time your current settings will be populated and you can then edit them.
Once you have made your changes click the Confirm Edit link to close the dialog and update your Map.
Auto-Snap
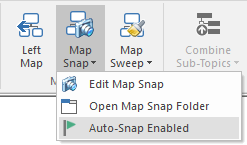 You will need to enable Auto-Snap in order for it to work. You can do this from the drop down menu of the Map Snap command. When enabled you will see the green flag icon next to the command and the main command will become “lit” while Auto-Snap is enabled.
Once enabled, Auto-Snap will run the next time MindManager starts. It runs in the background and will Snap your Maps as you work without interfering with your work flow.
Auto-Snap time intervals work according to the current time and NOT the time span from when you first Snap your Map. For example, if you Snap your Map at 10:07am and you have set it to Snap at a 10 minute interval your first Snap will be stored in the root folder at 10:07am. Your first Auto-Snap will then occur at 10:10am, the second at 10:20am and so on. These will be stored within the Auto-Snap directories shown above.
As each Map has its own settings you can set Maps that you work on regularly to Snap more frequently than one that might only change once an hour etc.
Map Snap is a great way to store hourly backups of your work and offers the ability to be able to rollback to an earlier version when required. Ideal when creating dashboards or running “what if” scenarios.
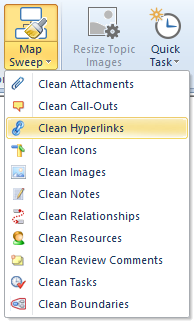 Map Sweep
Map Sweep is a Map Action although it can be used on single Topics if you wish. The command will remove Topic elements en masse across the Map of a selection of Topic(s).
The command is useful when you are working with Maps where you wish to clean Topic elements quickly across a large selection of Topic(s). Map Sweep can also be set to sweep a default set of Topic elements with one-click of the top section of the command.
Map Sweep has two modes one of which uses settings you can configure in the MAP Settings option available from the Map Sweep command located on the MAP Taskpane. Simply select the Map elements you wish the default sweep to remove from the Map and then click on “Close”.
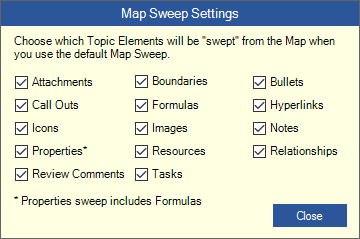
These settings remain in place until you change them.
Map Sweep can take a while to complete if you run it across a large map which contains many of the elements you have chosen to clean. Make sure you give large Maps time to complete the process.

MAP for MindManager Trial
Buy MAP
MAP for MindManager is available to purchase securely through our online store.
Visit the store to view license options.
Contact us for multi-user pricing or custom quotes.
MAP User Guide
Download and view the MAP for MindManager User Guide in Map format to learn more about each of the tools available in this feature packed add-in